SpringBatch에서 Mutlti datasource 설정
회사내에서 배치 작업을 잠시 하게 되었습니다. 오랜만에 자바를 사용해보는거라 재미있네요. 스프링 설정은 이젠 javaconfig 만으로 웬만한 설정은 다 할수 있습니다.
추가 정보 : 스프링 배치에 대한 문서는 토리맘님의 한글 라이즈 프로젝트에 한글로 번역된 문서가 있습니다.
spring initializr를 활용한 프로젝트 생성
SpringBatch의 초기 프로젝트를 spring initializr에서 생성 합니다.
제가 준 옵션은 아래와 같습니다.
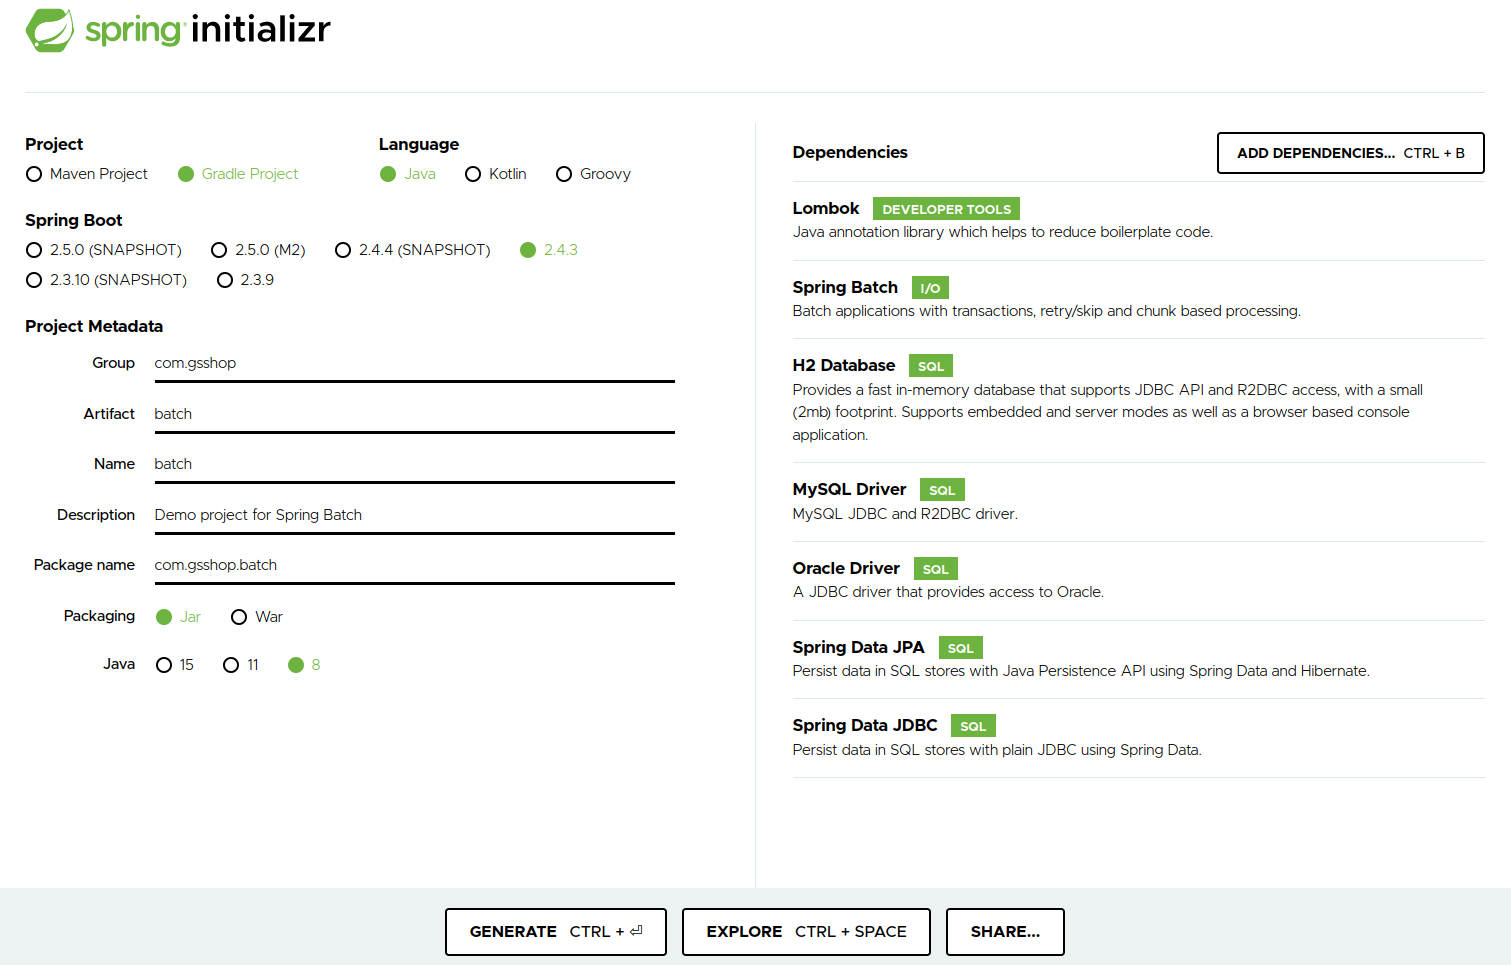
Gradle을 사용하고, Jdk는 1.8을 지정하였습니다.
Mysql은 Spring Batch의 Meta데이터를 저장하는 용도이며, H2 DB는 개발용으로, Oracle는 배치 데이터의 조회 & 적재용으로 사용하게 됩니다.
개발툴은 intellij 기준으로 진행합니다.
초기 환경 구성 진행
spring initializr 에서 프로젝트 정보를 입력하고 생성 & 다운로드합니다.
다운로드한 파일의 압축을 풉니다.
intellij에서 open 을 선택하고 압축 푼 디렉토리를 선택합니다.
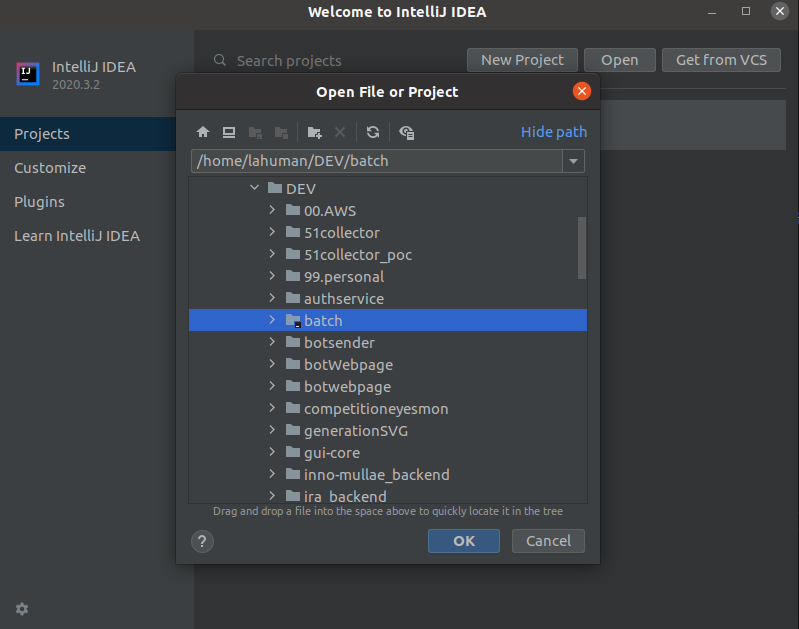
Gradle에서 관련 모듈 다운로드가 완료되기를 기다립니다.
Spring Batch 설정
기본적인 Spring Batch에 대한 내용은 Spring Batch Introduction을 읽어보시기를 권장합니다.
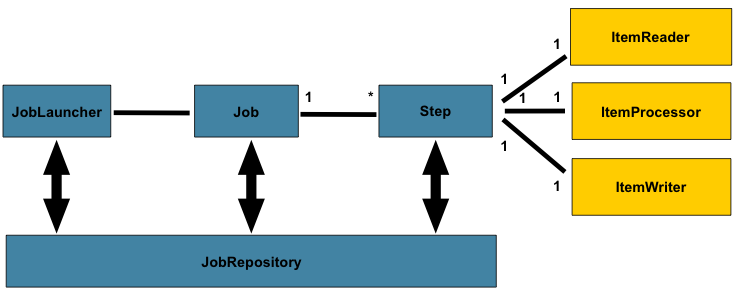
Spring Batch는 Job, Step, 사용자가 개발하는 처리 유닛으로 나누어져 있습니다. 이렇게 구현함으로 다음과 같은 장점을 얻을 수 있습니다.
- 명확한 관심사 분리
- 인터페이스로 제공하는 명확한 아키텍처 레이어와 서비스
- 빠르게 적용하고 쉽게 응용할 수 있는 간단한 디폴트 구현체
- 크게 향상된 확장성
Creating a Batch Service를 기준으로 코드를 작성 할 예정입니다.
src/main/resources/sample-data.cvs에 아래 내용을 작성하고 저장합니다.
Jill,Doe
Joe,Doe
Justin,Doe
Jane,Doe
John,Doe
데이터가 적재될 table을 생성하는 스크립트를 src/main/resources/schema-all.sql에 아래 내용을 작성하고 저장합니다.
DROP TABLE people IF EXISTS;

CREATE TABLE people  (
    person_id BIGINT IDENTITY NOT NULL PRIMARY KEY,
    first_name VARCHAR(20),
    last_name VARCHAR(20)
);
Spring Boot는
schema-@@platform@@.sql파일을 시작시 실행합니다.-all은 모든 플랫폼을 의미합니다.
저장 데이터 구조가 되는 Person.java를 생성합니다.
package com.gsshop.batch.work;

public class Person {

    private String lastName;
    private String firstName;

    public Person() {
    }

    public Person(String firstName, String lastName) {
        this.firstName = firstName;
        this.lastName = lastName;
    }

    public void setFirstName(String firstName) {
        this.firstName = firstName;
    }

    public String getFirstName() {
        return firstName;
    }

    public String getLastName() {
        return lastName;
    }

    public void setLastName(String lastName) {
        this.lastName = lastName;
    }

    @Override
    public String toString() {
        return "firstName: " + firstName + ", lastName: " + lastName;
    }

}
데이터를 받아서 대문자로 처리 하는 PersonItemProcessor을 생성합니다.
package com.gsshop.batch.work;

import org.slf4j.Logger;
import org.slf4j.LoggerFactory;

import org.springframework.batch.item.ItemProcessor;

public class PersonItemProcessor implements ItemProcessor<Person, Person> {

    private static final Logger log = LoggerFactory.getLogger(PersonItemProcessor.class);

    @Override
    public Person process(final Person person) throws Exception {
        final String firstName = person.getFirstName().toUpperCase();
        final String lastName = person.getLastName().toUpperCase();

        final Person transformedPerson = new Person(firstName, lastName);

        log.info("Converting (" + person + ") into (" + transformedPerson + ")");

        return transformedPerson;
    }

}
작업에 대한 처리가 완료 되었을대 확인이 가능한 리스너를 제작합니다.
해당 리스너의 역할은 단순히 작업이 완료 되었을 경우 저장된 데이터를 출력하게 됩니다.
package com.gsshop.batch.work;

import org.slf4j.Logger;
import org.slf4j.LoggerFactory;
import org.springframework.batch.core.BatchStatus;
import org.springframework.batch.core.JobExecution;
import org.springframework.batch.core.listener.JobExecutionListenerSupport;
import org.springframework.beans.factory.annotation.Autowired;
import org.springframework.jdbc.core.JdbcTemplate;
import org.springframework.stereotype.Component;

@Component
public class JobCompletionNotificationListener extends JobExecutionListenerSupport {

    private static final Logger log = LoggerFactory.getLogger(JobCompletionNotificationListener.class);

    private final JdbcTemplate jdbcTemplate;

    @Autowired
    public JobCompletionNotificationListener(JdbcTemplate jdbcTemplate) {
        this.jdbcTemplate = jdbcTemplate;
    }

    @Override
    public void afterJob(JobExecution jobExecution) {
        if(jobExecution.getStatus() == BatchStatus.COMPLETED) {
            log.info("!!! JOB FINISHED! Time to verify the results");

            jdbcTemplate.query("SELECT first_name, last_name FROM people",
                    (rs, row) -> new Person(
                            rs.getString(1),
                            rs.getString(2))
            ).forEach(person -> log.info("Found <" + person + "> in the database."));
        }
    }
}
Batch의 시작점인 BatchConfiguration을 작성합니다. 해당 내용에는 reader, processor, writer, 조립 설정 등이 포함 됩니다.
package com.gsshop.batch.work;

import org.springframework.batch.core.Job;
import org.springframework.batch.core.Step;
import org.springframework.batch.core.configuration.annotation.EnableBatchProcessing;
import org.springframework.batch.core.configuration.annotation.JobBuilderFactory;
import org.springframework.batch.core.configuration.annotation.StepBuilderFactory;
import org.springframework.batch.core.launch.support.RunIdIncrementer;
import org.springframework.batch.item.database.BeanPropertyItemSqlParameterSourceProvider;
import org.springframework.batch.item.database.JdbcBatchItemWriter;
import org.springframework.batch.item.database.builder.JdbcBatchItemWriterBuilder;
import org.springframework.batch.item.file.FlatFileItemReader;
import org.springframework.batch.item.file.builder.FlatFileItemReaderBuilder;
import org.springframework.batch.item.file.mapping.BeanWrapperFieldSetMapper;
import org.springframework.beans.factory.annotation.Autowired;
import org.springframework.context.annotation.Bean;
import org.springframework.context.annotation.Configuration;
import org.springframework.core.io.ClassPathResource;

import javax.sql.DataSource;

@Configuration
@EnableBatchProcessing
public class BatchConfiguration {
    @Autowired
    public JobBuilderFactory jobBuilderFactory;
    @Autowired
    public StepBuilderFactory stepBuilderFactory;

    @Bean
    public FlatFileItemReader<Person> reader() {
        return new FlatFileItemReaderBuilder<Person>()
                .name("personItemReader")
                .resource(new ClassPathResource("sample-data.csv"))
                .delimited()
                .names(new String[]{"firstName", "lastName"})
                .fieldSetMapper(new BeanWrapperFieldSetMapper<Person>() {{
                    setTargetType(Person.class);
                }})
                .build();
    }

    @Bean
    public PersonItemProcessor processor() {
        return new PersonItemProcessor();
    }

    @Bean
    public JdbcBatchItemWriter<Person> writer(DataSource dataSource) {
        return new JdbcBatchItemWriterBuilder<Person>()
                .itemSqlParameterSourceProvider(new BeanPropertyItemSqlParameterSourceProvider<>())
                .sql("INSERT INTO people (first_name, last_name) VALUES (:firstName, :lastName)")
                .dataSource(dataSource)
                .build();
    }

    @Bean
    public Job importUserJob(JobCompletionNotificationListener listener, Step step1) {
        return jobBuilderFactory.get("importUserJob")
                .incrementer(new RunIdIncrementer())
                .listener(listener)
                .flow(step1)
                .end()
                .build();
    }

    @Bean
    public Step step1(JdbcBatchItemWriter<Person> writer) {
        return stepBuilderFactory.get("step1")
                .<Person, Person> chunk(10)
                .reader(reader())
                .processor(processor())
                .writer(writer)
                .build();
    }
}
여기까지 설정하고 실행하면 잘 동작하는 것을 확인 할 수 있습니다.
Multi Datasoruce 설정
Multi datasource는 springboot의 multi Datasource를 사용하는 것과 동일합니다.
Datasource 생성을 하는 설정파일을 생성합니다.
package com.gsshop.batch.config;

import com.zaxxer.hikari.HikariDataSource;
import org.springframework.boot.autoconfigure.batch.BatchDataSource;
import org.springframework.boot.context.properties.ConfigurationProperties;
import org.springframework.boot.jdbc.DataSourceBuilder;
import org.springframework.context.annotation.Bean;
import org.springframework.context.annotation.Configuration;
import org.springframework.context.annotation.Primary;
import org.springframework.data.transaction.ChainedTransactionManager;
import org.springframework.jdbc.datasource.DataSourceTransactionManager;
import org.springframework.transaction.PlatformTransactionManager;

import javax.sql.DataSource;

@Configuration
public class DatabaseConfig {
    @Bean
    @Primary
    @ConfigurationProperties("spring.datasource.default")
    DataSource springBatchDb(){
        DataSourceBuilder builder = DataSourceBuilder.create();
        builder.type(HikariDataSource.class);
        return builder.build();
    }

    @Bean
    @BatchDataSource
    @ConfigurationProperties("spring.datasource.work")
    DataSource workDb(){
        DataSourceBuilder builder = DataSourceBuilder.create();
        builder.type(HikariDataSource.class);
        return builder.build();
    }

    // Transaction Setting

    @Bean
    PlatformTransactionManager springBatchTxManager() {
        return new DataSourceTransactionManager(springBatchDb());
    }

    @Bean
    PlatformTransactionManager workTxManager() {
        return new DataSourceTransactionManager(workDb());
    }

    @Bean
    PlatformTransactionManager chainTxManager() {
        ChainedTransactionManager txManager = new ChainedTransactionManager(springBatchTxManager(), workTxManager());
        return txManager;
    }

}@Primary는 기본으로 DatasSource를 이용할 경우 자동으로 주입되는 DataSource 입니다.@BatchDataSource는 SpringBatch의 Meta정보를 저장할 때 사용하는 DataSsource 입니다.
특정 DataSource 사용할 경우 @Qualifier를 이용합니다. 다음 예제를 확인하셔요.
@Bean
public JdbcBatchItemWriter<Person> writer(@Qualifier("workDb") DataSource dataSource) {
    return new JdbcBatchItemWriterBuilder<Person>()
            .itemSqlParameterSourceProvider(new BeanPropertyItemSqlParameterSourceProvider<>())
            .sql("INSERT INTO people (first_name, last_name) VALUES (:firstName, :lastName)")
            .dataSource(dataSource)
            .build();
}